The Top 6 Most Helpful Food Photography Tips
When I started blogging I did not have a clue about anything. I didn’t know about food photography, lighting, backgrounds, reflectors, or props. I have learned so much about taking food pictures and I am still progressing everyday. It is fun to be pushed out of my comfort zone and try to new photography tips and tricks. It is also important to learn about food styling and presentation which have improved a great deal with many hours of practice.
I am by no means saying I am perfect but I feel like I am 300% better than I used to be at taking food photography for my blog or Instagram and Facebook. I want to save you the a lot of heartache and misery that I went through on my very steep learning curve. I wish I had known these things when I started my blog in Dec 2010. Now after I have written two e-book I can say that I enjoy food photography and am excited to make capture my recipes. It seems like my readers enjoy my work a lot and it feels good to have people take pleasure and share my recipes.
Top 6 Tips for Beautiful Food Photos
1. Take photos during the day (not optional!!)
Taking photos during the day is number one for a reason. Taking pictures at night is more work and takes special equipment and skills. To take out 90% of the guess work just take pics during the day light. Get near a window and turn off the overhead light for best results. You can also try using a thin curtain to soften the day light.
Plus I like the idea of being “off work” at night so you don’t have any more pressure to cook or take photos. I just love to get all my cooking done in the daytime. If it is a cookie or brownie and you can save some until the morning would be ideal. Also the early morning or later in the afternoon is better for shooting to avoid the harsh midday sun.
2. Use a nice background
If you don’t want to invest any money just use a wood table, outdoor deck or even a wood cutting board. If you have nice granite counter tops that will work too. You don’t have to have a house like Martha Stewart to create the same feeling, you just need a nice background. I like to find scraps of wood at a salvage place or just get some plywood at Home Depot then stain it a dark color.
3. Try different angles
Taking food from straight overhead often looks very nice. Also straight on is great especially if you have a pile of cookies or stacked pancakes. Doing a vertical picture is appealing if you want to create a shallow depth of field. You don’t need a fancy camera and it is okay to use your camera phone, if you are just getting started. I shot a lot of my early blog photos with a point and shoot that worked well. As long as you go outside and use natural light you can get pretty good shots just using the auto setting.
Now I have this camera and I love it because it has lots of tools that make photos look great without much work from the photographer. Having this lens which will create a shallow depth of field that will make the food in the front pop and the scenery in the back blurry which is what most people are going for.
4. Use a reflector
Getting a reflector made a huge difference for me especially in San Francisco where it is often foggy and overcast. A reflector concentrates any light there is back onto the plate of food and it really enhances the look of the dish. Without a reflector the food will look okay but the light may not draw the viewer to the right focal point. Also the food will look flat and can even seem to be a bit grainy. I have a reflector like the one here.
5. Use the rule of thirds
When you look at a big buffet of food or a whole pie, the voice in your head says I want to show all this food to everyone. But in photography less is often more. It is better to focus on one plate rather than the whole buffet. In the case of a plate of food or a pie, many times two thirds of the pie is going to be a better picture than the whole pie. It may be even better to take a piece out of the pie and have a bite missing or on the end of the fork, which will really make the scene seem authentic. So the rule of thirds means that you need to have the focal point in 1/3 or 2/3 of the photo but not dead in the middle. By having the focus just off center a bit it draws the viewer in to the picture and makes it more interesting.
If you do want to shoot a large buffet of food try taking the photo over head for the right effect.
6. Add a splash of color
I used to think you wanted to have a whole table cloth under the food but really it is best to have one bright napkin on the side of the plate to catch people’s eye. Get some white plates that are nice and simple and do not detract from the food. Also it is a good idea to have something from the recipe like a tiny bowl of spices, a wedge of lemon, a chocolate covered spatula. Play around with props and have fun. But keep it clean and simple you don’t want to look like a hoarder, lol.
Bonus: If you do have a DLSR I highly recommend getting a tripod. It made a huge difference for me. My picture used to always be blurry no matter what I did but now I can just use my tripod without worrying about fuzzy food pics. Also it helps to have your hands free to be able to adjust spoons, napkins, reflectors ect. I fell in love with my tripod after the first day of using it. You can get a small one here that is great for working with food. I have this one.
What photography tips would you add?
Be Sure to Pin It:
Ready to take your food pics to the next level?
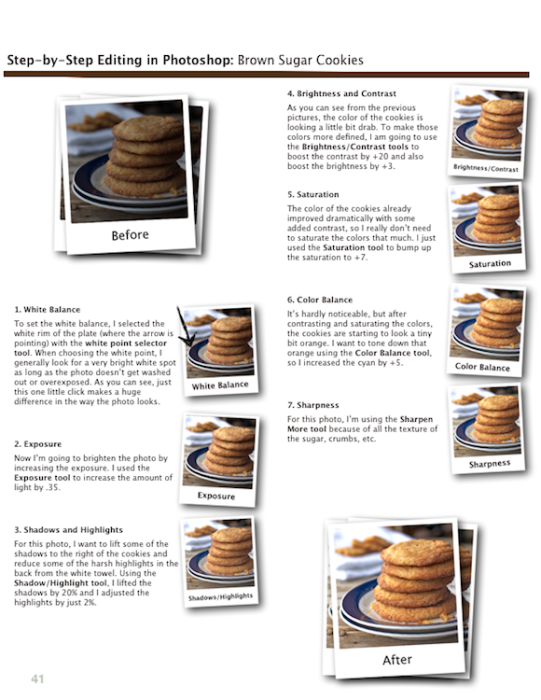
One e-book that really helped me turn a corner and improve my blog photos was this guide. The authors break it down in an easy to understand language that even your grandma could grasp. The great thing about this book is that you can refer back to it over and over when you get a little rusty or out of practice. Don’t worry, you don’t need a fancy camera to get started, proper lighting (daylight) , props and backgrounds can go along way. Pinch of Yum can break it all down for you in this yummy food photography book!
Some people might say this info is available on for free and maybe that is true. But do you have thousands of hours to scour the internet for information? I sure don’t!!
Also much of the info out there on blogs about photography is very generalized and it is not geared toward food photography. Stop wasting time and grossing out your family and friends with your dinner slop on a plate. Get serious and start taking some tasty photos!
Get this book is from a husband and wife team who spend their whole life taking food photos.
Click here for an instant download:






Loved your way of blogging. You are best blogger. Keep on rocking! Your blogging style is awesome in its own way